Excel Rubbon customization
Hi there, nice to see you again for a new VBA tuto ^^
Today we will go a bit further than the usual scope of our vba tutos and see how we can, through the use of both xml and vba, create our own custom ribbon that
suits exactly our need. But don't worry if you don't have any previous experience with xml this tuto is also for you As a matter of fact I didn't had any previous knowledge of xml before coding my first ribbon and as you will see the code needed here is really easy
to implement and understand.
But enough talking, let's get down to it !
Set-up
That's one of the most important part and the one that could be a bit tricky at first to a follow the first time so don't worry if it doesn't work at first and just take it back from the previous step if at some point you don't obtain the same result as me.
- Step 1 : Open excel and save your file with the format .xlsm in a new folder created to this effect
- Step 2 : Close the file and rename it by adding the extension .zip in my case here it gives us "Custom.xlsm.zip"
- Step 3 : Extract the data from your new zip file
- Step 4 : Go into your newly created folder and inside of it create a new folder called customUI
- Step 5 : Open the notepad and copy paste the following code snippet :
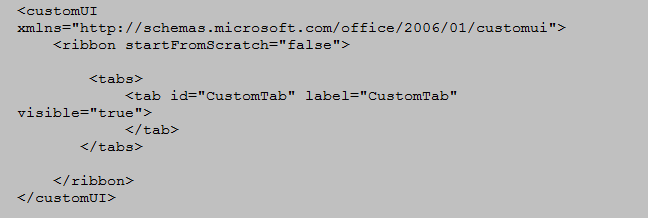
- Step 6 : Save this new notepad file inside your newly created customUI folder with the following name (conventional name) : customUI.xml and close the notepad
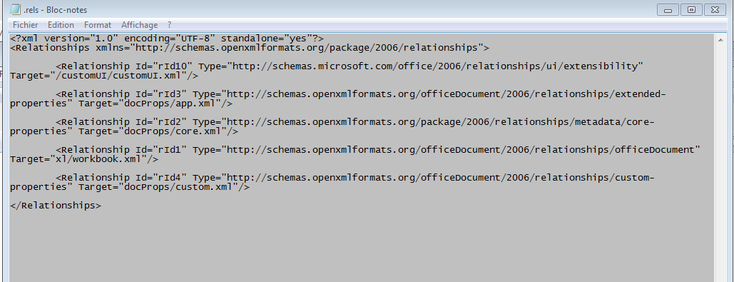
- Step 7 : We need to create a new relationship between our workbook and our new customUI xml file. To do so open again the notepad go into the menu on the top left of the notepad and click onto file/open. Browse into the extracted folder and go into the .rels folder, and once you're in here on the bottom of the window instead of text files select all files and open the .rels file.
- Step 8 Once you're in the file add as shown below the following code snippet :
<Relationship Id="rId10" Type="http://schemas.microsoft.com/office/2006/relationships/ui/extensibility"
Target="/customUI/customUI.xml"/>
Then save and close the file.
- Step 9 : Go back to your extracted folder and rezip it entirely
- Step 10 (Also known as the moment of truth ^^') : Rename your zip file by suppressing the ".zip" extension and open the file and normally you should be able to spot a new tab on your ribbon menu called CustomTab with no controls.
Extras kudos to you if you were able to get it first try because that usually require several tries the first time around ^^'
And that's it ! We're now set up and ready to create our new custom ribbon.
Creating your custom ribbon
The possibility of customization for the excel ribbon are pretty much endless so in order to keep things not too long in this tutorial we will create a custom menu using :
buttons
combo box
groups
box
control
which should in the end look like this

However there are a lot more possibilities like dynamicMenu, dropDown and so on. So if we didn't cover the scope of what you need in this tuto don't hesitate to go visit this link (it's in french but it gives good coding example for each control)
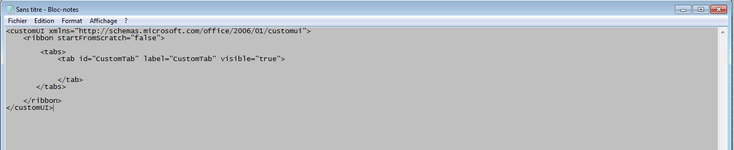
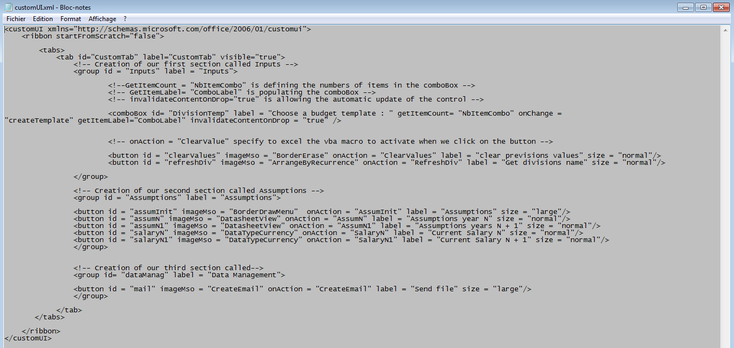
Now, to start creating our custom ribbon, we need to open the notepad and as previously go into File/Open, browse into our extracted file, enter into our folder customUI, choose "all file" and open our customUI.xml file.
Normally you should end up with a file like this :
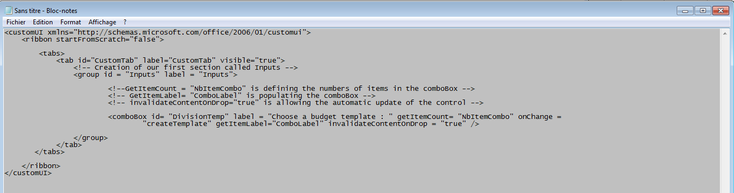
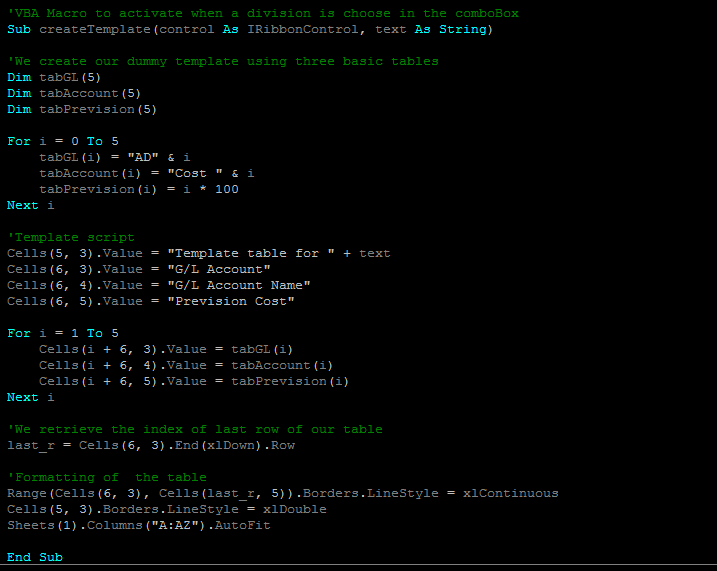
At first we will create our combo box which is a control allowing you to choose a data in a list of choice or write directly the label of the wanted data in the input text field.
Moreover given that we have either the case of defining statically or through a vba macro each item of our combo box we will in this example do the second case in order to showcase the more useful example. So first you will need to modify the code of your customUI.xml file as follows in order to create the comboBox control in your custom ribbon :
Once it's done save and close the notepad. Now it's important to note that the change that you did in your xml file didn't impact the previous version of our excel file. Indeed we can't just open our excel file again and expect to see the new control in our CustomTab it would be too easy ^^. So to be able to get the new version we have to redo the last step of our previous set-up process and again zip all the extract files and once it's done rename it by suppressing the ".zip" extension. This way when you'll open this new version of the file the modfication that you made in your xml file will be taken into account and you will see appear our new comboBox control.

Tip : Given that each time you have to make a change in your xml file you end up creating a new excel file it's a good idea to suppress the previous excel file whenever a change is made in customUI.xml to avoid ending up with a really messy folder and dozens of excel files in it ^^'.
Now that we have our new ribbon control there is two possibilities moving forward :
- Code directly the vba macro but given that we will create new versions of our excel file when creating other controls we will have to save this macro elsewhere in a text file to not have to redo everyhting each time.
- Create all our controls in our xml files first and then code all our vba macros at once.
Usually I'm using the first method as I like to not loose the idea of the control and like to have a folder with all my vba macro. However it will be easier in this present case to use the second method to not loose anyone by going back and forth between vba and xml.
So let's reopen the customUI.xml file as previously. We will now have to create the rest of CustomTab by modifying the code as follows :
notes :
The groups allows us to regroups different controls altogether in a specific section.
The box control allows us to regroup some controls of a group in a same section and choose the way they're displayed (here horizontal) among other things.
imageMso : is the name used by excel to display the control illustration (here is a link displaying most of the imageMso names)
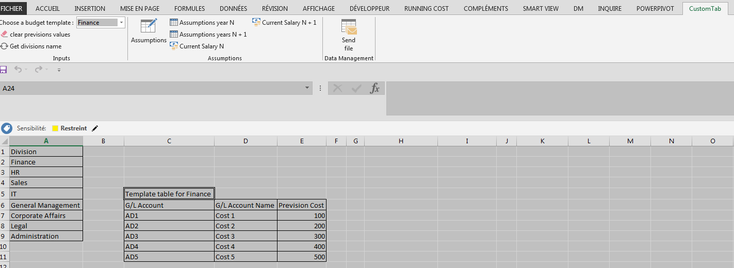
Once it's done we will have to to rezip another time all our files altogether and rename it by supressing the ".zip" extension and normally we should end up with something like this :

Tip: If you've made a mistake in your xml file, excel will prompt you an error message specifying the problem and the line where it is. However if you use the notepad given that we don't have any line index on the side you'll have indeed to count by hand the line from the top of the notepad to find the place where the problem is happening.
So now that we have our custom ribbon up and running in our excel file we will have to code the vba macros in order to not get thrown an error message everytime we click on one of our custom control. So let's get to it and start with our comboBox.
ComboBox code :
The coding of our comboBox will be process in two steps :
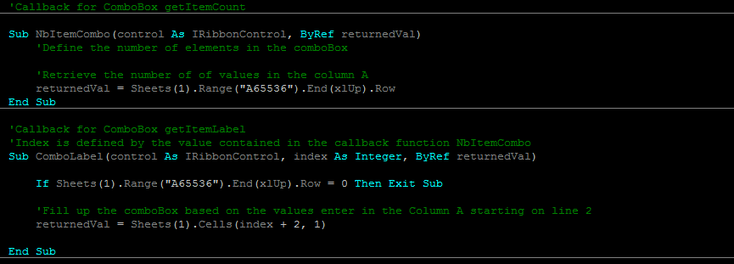
First we will need to populate our comboBox with the values registered in column A. To do so we will need to create the two following call back functions :
- NbItemCombo : which defines the number of element that we want to be implemented into our comboBox
- ComboLabel : which populates our comboBox with the labels that we desire
n.b. To keep things simple here we will populate our comboBox with values contained in the column A of our spreadsheet.
Now that we have a a fully working comboBox, let's code the two remaining buttons of our Inputs section.
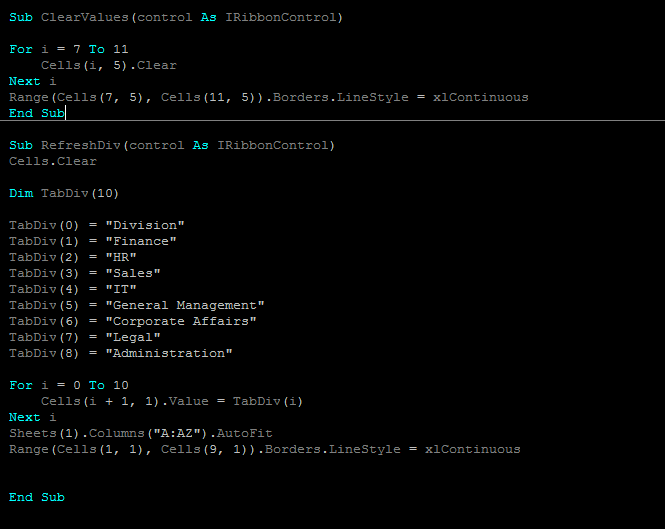
Observation : Given that in this example we keep things simple and populate our comboBox with the values of our column A instead of using values from a source file we need to recreate
our column A everytime we want to use our comboBox hence the utility of the button "Get division name".
From that point given that all our other controls are also buttons we are going to use the same syntax in each case so I let you go check the code on the github page if you want to try it for yourself.
Tip :
If the button send file doesn't work that means you need to enable the Microsoft Outlook 15 Object Library. To do so go into visual Basic choose Tools open reference and enable it and you should be good to go ;)
So if everything is working smoothly congratulations you're now able to create customized ribbon to suit your need and link them to your personal macro which is a pretty cool stuff and can come pretty handy at times.
n.b. As always the entire code is on github if you want to look it up or have a closer look at some parts.
And that's all for me for today ! :)
So I hope you enjoyed this tuto which was bit more technical than usual and don't hesitate to play around and had other controls on your ribbon to build on top of that tuto and get a more deep understanding of the ribbon customization.
In the meantime take care and happy coding !

All information/documents contained in this website rely solely on my personal beliefs, and do not constitute professional investment advice.
Be careful in your investment and do not invest more than you can afford to loose.
Contact :
e-mail: christophe.richon.pro@gmail.com